OOP Java P1 Wk4
17 Jul 2017 | MOOCStarting the week 4 of MOOC.fi OOP and it will cover mainly the basics of objects. Consists of Exercise #70 to Exercise #83. I had had a hard time to grasp the concept of Java’s Object-oriented programming. I struggled mostly because of rigorous TMC wanting me to program in their ways. The summary of this week 4 is:
“Oh man, week 4 is tough.”
I realized that I need to improve my programming readability. My goal is to understand the programming concept fully and I am going to add comments to every code I write down. I will attempt to understand the concept and understand what computer is thinking when it parses my code.
Basics of objects
Methods and Copying parameters
In Exercises #70 and #71, we learn why parameter is needed. Method’s variable isn’t visible to other methods unless through parameter. By “visible”, I mean giving variable’s information.
- method variable is not visible to other methods
- can pass method variable’s information to other methods through parameter
- when passing method variable’s data to another method, it’s actually copying
- copied to “new variable”
- original method variable remains unchanged
- Only values of primitives data types (int, double, char, boolean, …) can be passed as parameters
Exercise #72 wants us to combine two different lists together while having number to be listed only once. Same number cannot be listed twice. I am still new with java, so I am not sure if the order of methods matters. Let’s take a look at main method first so we can figure out what to make in smartCombine method.
public class SmartCombining {
    public static void main(String[] args) {

        ArrayList<Integer> list1 = new ArrayList<Integer>();
        ArrayList<Integer> list2 = new ArrayList<Integer>();

        Collections.addAll(list1, 4, 3);

        Collections.addAll(list2, 5, 10, 4, 3, 7);

        // remove comment when method ready
        System.out.println(list1);
        System.out.println(list2);
        smartCombine(list1, list2);
    }
}
We see in main method, it has two different ArrayLists: list1, and list2. Uses Collections.addAll to insert numbers into a list. Finally… we can see method smartCombine with two lists in a parameter being called. Time to make smartCombine method!
public static void smartCombine(ArrayList<Integer> first, ArrayList<Integer> second) {
    for (int num : second) {
        if (!first.contains(num)) {
            first.add(num);
        }
    }

    System.out.println(first);
}
We know to add two arguments to the parameter. It is important to define argument so it can be passed as that type of data. Defined both arguments as ArrayList<Integer>. Used for loop to go through every number in second list. first.add(num) add numbers from second list to first list. (!first.contains(num)) allows any number in second list that first list lacks, to be added into. That is the very basic concept of usage in parameter.
Guideline to being a good programmer
- Well indented and airy codes
- not crammed in which made reading more difficult
- give room to comments
- Avoid copy and paste
- Separate tasks with methods
- use descriptive names for each method
Things to know about Object
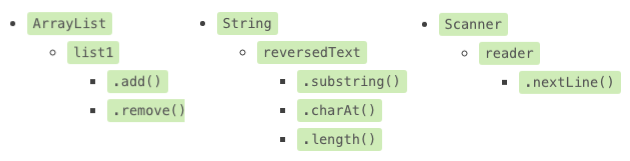
We have used ready-made objects before. We would assign a name to ArrayList
Classes: ArrayList, String, Filename, Scanner …
Objects: instances of classes like list1, list2, text, reader, …
Methods: .add(), .contains(), .remove(), .substring(), .charAt() …
Now putting these in cascading order:
- Classes
- Objects
- Methods
- Objects
Examples and in same order as above:
Objects have their own methods, and information contained inside object is called state of the object. State of the object holds attributes
I am going to borrow this paragraph from MOOC.fi:
“Each separate object has its own individual responsibility; an object contains a related group of information and functionality. Object-oriented programs consist of multiple objects which together define how the program works.””
Back to Week 4! Ready to learn how to use objects!
From Exercise #72 to Exercise #77 teach us how to work with two different class files. On the left is “Main” Class. It doesn’t have to be called “Main”. It is called that, because it is the file that executes. The Class on the right would be often called any name as long as it’s according to its function. I am going to call this “non-main” Class for the sake of distinct between Main and non-main classes. Look at two different classes from Exercise 78 below:
Main Class
import java.util.Scanner;

public class Main {

  public static void main(String[] args) throws Exception {
      BoundedCounter seconds = new BoundedCounter(59);
      BoundedCounter minutes = new BoundedCounter(59);
      BoundedCounter hours = new BoundedCounter(23);

      seconds.setValue(50);
      minutes.setValue(59);
      hours.setValue(23);

      while ( true ) {
          System.out.println( hours + ":" + minutes + ":" + seconds );
          Thread.sleep(1000);
          // put here the logic to advance your clock by one second
          if (seconds.getValue() == 59) {
              minutes.next();
          }

          if (seconds.getValue() == 59 && minutes.getValue() == 0) {
              hours.next();
          }


          seconds.next();
      }
  }
}
BoundCounter Class
public class BoundedCounter {
    private int value;
    private int upperLimit;

    public BoundedCounter(int upperLimit){
        this.value = 0;
        this.upperLimit = upperLimit;
    }

    public void next(){
        if (this.value < upperLimit) {
            this.value++;
        } else {
            this.value = 0;
        }
    }

    public String toString(){
        if (this.value < 10) {
            return "0"+ value;
        }
        return "" + value;
    }

    public int getValue() {
        return this.value;
    }

    public void setValue(int time) {
        if (time >= 0 && time <= upperLimit) {
            this.value = time;
        }
    }
}
Main Class is the one that executes, what it usually possess:
public static void main(String[] args)method- newly assigns objects by using “non-main”, or in this case
BoundedCounter()constructor - uses methods that are created in “non-main” Class file
non-main Class like “BoundedCounter” Class possess:
- constructor: formatting the state
- always same name as the Class
- used to initialize
private variables
- encapsulation, or hidden attributes using
private - defined variables: object variables, object fields, or object attributes (all are the same things)
Exercise 78
We are going to review this exercise step by step. Hold Main Class file for later and starting with “non-main” class or rather already named BoundedCounter class.
public class BoundedCounter {
    private int value;                  //encapsulation
    private int upperLimit;             //encapsulation
}
What is encapsulation and why?
Encapsulation makes the fields in a class private and providing access to the fields via public methods. private can be described as a protective barrier that prevents the code and data being randomly accessed by other code defined outside the class. The main benefit is the ability to modify our implemented code without breaking the code of others who use our code. With this feature Encapsulation gives maintainability, flexibility and extensibility to our code.
Encapsulation is usually on the top when one knows what variables or values are to be named or to be used.
Constructor
Every “non-main” class file has constructor method like shown below in the code block. It looks like a method, but it is not. Notably differences between constructor and method:
- constructor has to be named the same as its Class filename
- constructor doesn’t have a return type
- constructor is not considered a member of the class
- constructor is called automatically when a new instance of an object is created
public class BoundedCounter {
    private int value;                  //encapsulation
    private int upperLimit;             //encapsulation

    public BoundedCounter(int upperLimit){       //constructor
        this.value = 0;
        this.upperLimit = upperLimit;
    }
}
After the routinely encapsulation and constructor at the top of “non-main” class, what comes after are methods, getters, and setters. What Exercise 78 wants next:
a counter has an object variable that remembers the value of the countera value that is within the range 0 to upperLimitin the beginning the value is 0the upper bound of the value is defined by the constructor parameter- the method next increments the value of the counter
- if the value would be more that the upper limit, it wraps around and becomes zero
- the method toString returns a string representation of the counter value
Strikethroughs are done, or completed. Let’s do a .next() method.
public void next(){
    if (this.value < upperLimit) {
        this.value++;
    } else {
        this.value = 0;
    }
}
A simple algorithm, having value to increase if it is under upperLimit. If value is no longer under upperLimit, it becomes a zero. It doesn’t increase on its own. It has to increase by Main class. Now for the next step, MOOC.fi just introduced this method .toString() and explained that it had been teaching us to create a method to print an object using like printPerson, and this is not the recommended way. It was a stepping stone to help us to understand the programming. The recommended way is to use .toString() to print an object.
    public String toString(){
        if (this.value < 10) {
            return "0"+ value;
        }
        return "" + value;
    }
Accessors: getters and setters
Accessors are used to make API more stable, not exposing fields of a class. Let’s compare with and without accessors. Without Accessors:A field public in a class is accessed by other classes, BUT later on extra logic and changes are being added. Meaning more works and more changes to each class that refers it. With Accessors: Can easily add some logic like cache some data, lazily initialize it later.
Getters:
Considered the ‘correct’ way to name an object-variable-returning method in this manner; as getVariableName. Getters can get access to private variables.
Setters:
Setters call a method that just sets a new value to a variable setVariableName. Setters can modify private fields.
    public int getValue() {
        return this.value;
    }

    public void setValue(int time) {
        if (time >= 0 && time <= upperLimit) {
            this.value = time;
        }
    }
getValue() just access to the this.value in an encapsulation. setValue() modifies the this.value by using a parameter (int time). It might be little confusing because all of these methods in the “non-main” class are pretty much just defining, and not executing.
Main Class executes
I am going to sail through Main Class, by pointing out what it executes.
“non-main” Class is being called and creates new objects as seen below in code block. Remember BoundedCounter(int upperLimit) from “non-main” Class.
BoundedCounter seconds = new BoundedCounter(59);
BoundedCounter minutes = new BoundedCounter(59);
BoundedCounter hours = new BoundedCounter(23);
In Main Class, we have Scanner reader = .... We use .setValue(time) to modify the value. Telling where objects’ time starts at.
int s = Integer.parseInt(reader.nextLine()); // read the initial value of seconds from the user
System.out.print("minutes: ");
int m = Integer.parseInt(reader.nextLine());// read the initial value of minutes from the user
System.out.print("hours: ");
int h = Integer.parseInt(reader.nextLine()); // read the initial value of hours from the user
seconds.setValue(s);
minutes.setValue(m);
hours.setValue(h);
Bit of algorithm, using while loop, .toString(), .getValue(), and .next(). .toString() isn’t visible in Main Class, but we know that it is operating from “non-main” Class. Objects hours, minutes, and seconds have .toString(). Conditional statement in “non-main” Class for .next() can be confusing, like if the value isn’t under upperLimit and then it shouldn’t be doing anything. .next() just keeping “increase” regardless, by an increment or start at 0 again.
int i = 0;
while ( i < 121 ) {
    System.out.println(hours + ":" + minutes + ":" + seconds);

    if (seconds.getValue() == 59) {
        minutes.next();
    }

    if (seconds.getValue() == 59 && minutes.getValue() == 0) {
        hours.next();
    }

    seconds.next();
    i++;
}
Comments